
A QA Case Study: Marvel’s Deadpool VR
Managing multiple teams is often a monumental task for game developers, especially with the added complexity of integrating assets from various external partners. At SuperGenius, we are experts in navigating this process. Our experience comes from our deeply-ingrained adaptability and experience in regard to diverse client needs, directors, workflows, and pipelines.
This adaptability means our artists are highly proficient across multiple software packages such as Maya, 3DSMax, and Blender, and can achieve the same results regardless of which is used. We are also familiar with a wide array of competing source control solutions, including Github, Perforce, Unreal Game Sync, Plastic SCM, Turtle SVN, and Helixcore, among others. We develop in both Unity and Unreal, and are also well versed in a variety of proprietary engines. Our core focus is training our artists to meet a variety of project needs, and seamlessly become an extension of every team no matter what tools are required.
So, what happens when you have all the artists you need, but no time to run it all through quality control?
SuperGenius Studio was thrilled to partner with Twisted Pixel Games on Marvel’s Deadpool VR for the Meta Quest 3. Our initial scope included animation and environment art, however early on in the project the art director presented us with the unorthodox and challenging request to take on QA for prop and environmental art submissions. This involved auditing assets from three different sources: two external partners and TPG’s internal team. We undertook this QA role while simultaneously developing our own props and environmental art pieces during periods when no assets were available for review. Here we outline the process by which we successfully managed this multi-faceted outsourcing and development task.
OVERVIEW
- Perforce and Source Control
- Source Art and Organization
- Art Review
- Checklists
- Engine Tasks
- Constraints
- Submissions
Perforce and Source Control

Seamless integration with every project’s source control ecosystem is our priority. We typically dedicate a day or two to ensure the successful pushing and pulling of assets, checking out assets in the editor, and overwriting files in the existing folder structure as necessary. While we have experience with various source control solutions, we are always prepared to learn new ones.
This integration process also includes setting up any necessary VPNs to connect to project servers or shared drives. We have an on-site IT specialist to manage our hardware and software requirements. However, we are also happy to coordinate with partners IT specialists if dedicated studio equipment is required solely for accessing proprietary material and intellectual property, as has been necessary for clients like Meta, Blizzard, and Twisted Pixel. In those cases, we simply awaited the arrival of the provided laptops or desktops and immediately began setup.
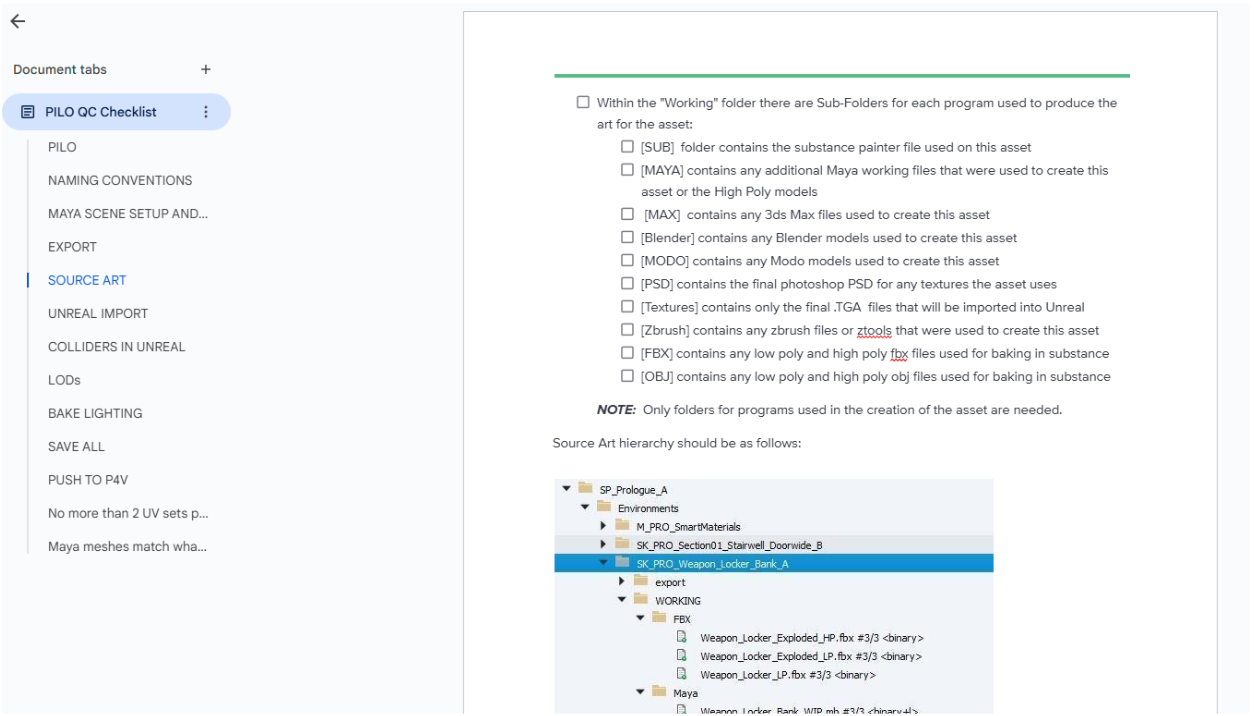
Source Art and Organization
As anyone working in a games pipeline has no doubt experienced, something as simple as one character being off or a simple typo can lead to broken pathways and failed directories. There are plenty of helpful tools that exist natively in Autodesk products like the File Path Editor in Maya or 3DSMax’s Asset Tracking toggle, and sourcing dummies rather than importing and merging entire scenes or props in context can go a long way to maintain source file integrity. However, with so many moving parts (hundreds of artists, thousands of assets and source files, and multiple studios often working from thousands of miles away in different countries) things get lost in translation, misplaced, pathed incorrectly, or convoluted exceedingly fast.
A significant portion of our file cleanup effort for this particular project was dedicated to resolving texture sourcing issues in Maya. We had to ensure that materials referenced textures either from the global material libraries established by Twisted Pixel within the shared project structure OR via a Relative Path, rather than an Absolute Path. A common problem we faced was scenes opening with missing textures. Although the texture may have been assigned correctly, the file path frequently pointed to an individual’s local machine and local directory. In some cases, if the team in question was located in a country like China, Russia, or India, paths could even be in a different language. We spent considerable time addressing these inconsistencies, which involved repathing textures and correctly setting project folders. This meticulous process was necessary so that these files would load correctly and universally for every artist, on every machine, every time.
When working with other partners on previous projects, we know that the project they’re working on often isn’t the only one – meaning the teams might have several hard drives and letter drives that don’t match the one the project is using. If textures are sourced from C:\ but the team only has space on Z:\ we may facilitate the use of a junction.
In addition to addressing file pathing issues we undertook the significant and time-consuming task of reorganizing the project within Perforce. If you’ve worked with Perforce, you know this is no small endeavor. Moving assets requires a tedious, multi-step process to avoid disrupting everyone’s workspace – we had to create a new folder, manually add the existing files, push those changes, and then—and only then—could we delete/archive the old location and repath the source files to the new folder.
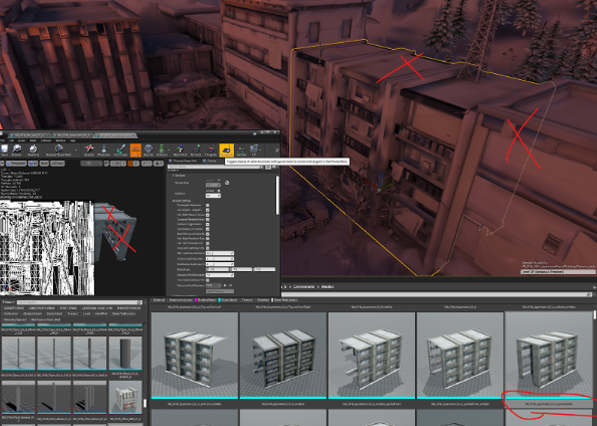
Another prevalent issue under our purview was the incorrect submission of props under the environment folder, which prevented the set dressing team or level designer from easily finding the asset. As well as redundant texture files: assets that shared materials often contained duplicate texture files in each individual asset folder, unnecessarily consuming space. We corrected this by ensuring that asset folders (for assets sharing materials) only house the working files and their FBX exports. All shared textures were moved to a root folder, while the textures in the working scenes pathed to a root folder for all the assets under a given designation.

Art Review
Every art director and every project has a different standard for their incoming assets and style benchmarks they have to hit, but when you’re assessing the quality of artwork coming in you may not have the time to do much beyond a cursory look and a quick approval based on the asset’s appearance: tessellation, texture quality, etc.
We delve beyond a surface review, examining the source files for any errors that could jump out at players or lead to greater complications than just cosmetic issues.
These errors include:
- Obvious texture seams
- Broken normals
- Nonmanifold geometry
- Z-Fighting
- Warped or skewed UVs
- Incorrect file setup
While these are relatively minor annoyances, they accumulate and cause problems later in the development pipeline. Although modern engines can generally catch and clean up these issues on import, this doesn’t fix the core problem: issues in the source art that shouldn’t be present in the first place. In our experience, we frequently need to return to the source files when addressing feedback. Therefore, ensuring assets are clean from the start is ideal. Catching these hiccups before an asset even reaches the editor offers peace of mind when making subsequent edits—for example, if a color change or extending an edge requires updating the UVs.
We also regularly checked to make sure that Substance Painter files had the correct mesh or latest model; sometimes a mesh edit might happen after texturing had concluded. We would archive the original mesh(es) and import the correct model for the Substance Painter file, and re-export textures accordingly. If cage(s) need to be updated or we need to rebake anything, we do that as well.
While perhaps not glamorous work, these tasks are crucial for maintaining project schedules and preventing time loss from searching for misplaced files.
The Checklist
A crucial step in making sure everything is accounted for in the QA process is nailing down what we should be keeping a consistent eye on. This is going to look different for every team – every difference in pipeline creates different gaps, but once we have your pipeline down — it’s off to the races.
We collaborated with the game’s production leads and art directors to nail down all the steps the artists go through during the art process. This collaboration results in a comprehensive checklist that verifies every step is completed correctly. If an art bible or documentation isn’t already made for best practices, we can do that too!
The checklist ensures that:
- Each step is completed, formatted, and named correctly.
- Files are organized logically.
- Key features necessary for smooth engine integration are included.
The list can include things like:
- Making certain the artist is using the smart materials as directed by the department head in their substance files
- Checking to see if the Maya / 3DS Max / Blender scenes are linking to the correct textures in the shared directory as opposed to pointing to some image download on somebody’s local desktop.
The checklist will include the entire pipeline, so this means steps beyond source control, like correctly named LODs, the correct number of UV Channels and correct texel density, or renaming colliders within the scene hierarchy if they’re coming in as static meshes as opposed to collision objects. This checklist will be used to comb through each and every asset before it makes it into the editor, saving your team time and, hopefully, production costs down the line.
Engine Tasks
While this might be a basic task for most developers, many environment artists (especially Junior, Level I, or prop artists) may not be involved in implementing in the editor, and directors and leads are often occupied with troubleshooting, asset tracking, and other high-priority issues. Having our team on the case allowed for level designers and set dressing teams to quickly access assets and immediately begin iterating on game levels, by streamlining the level creation process, integrating assets and setting all necessary parameters. Given our experience, we were able to serve as a flexible backup resource to prevent bottlenecks and help the team meet tight deadlines.
Collisions
Every game engine handles collisions differently, but in this case, colliders were made in Maya and assigned in the working file, using the UCX_ prefix to ensure they came into Unreal recognized as collision objects. In Unity, we know colliders can be added on the engine side using pre-existing primitives, or objects can be imported and assigned as specifically collision shapes to be used in one or more prefabs. In Godot, suffixes like -colonly or -convcolonly are used on collision objects.
Occasionally, when viewing an asset in Unreal, a strange-looking grey box would appear on top of a prop or environment art piece. This usually indicated a typo in the naming of the collision objects. Upon opening the working file, we often found an object starting with UVX_ parented under the asset. Our process involves renaming these objects, reimporting them, and confirming they function correctly. We also make sure to add any missing collisions or fix noticeable gaps that could affect gameplay.
LODs
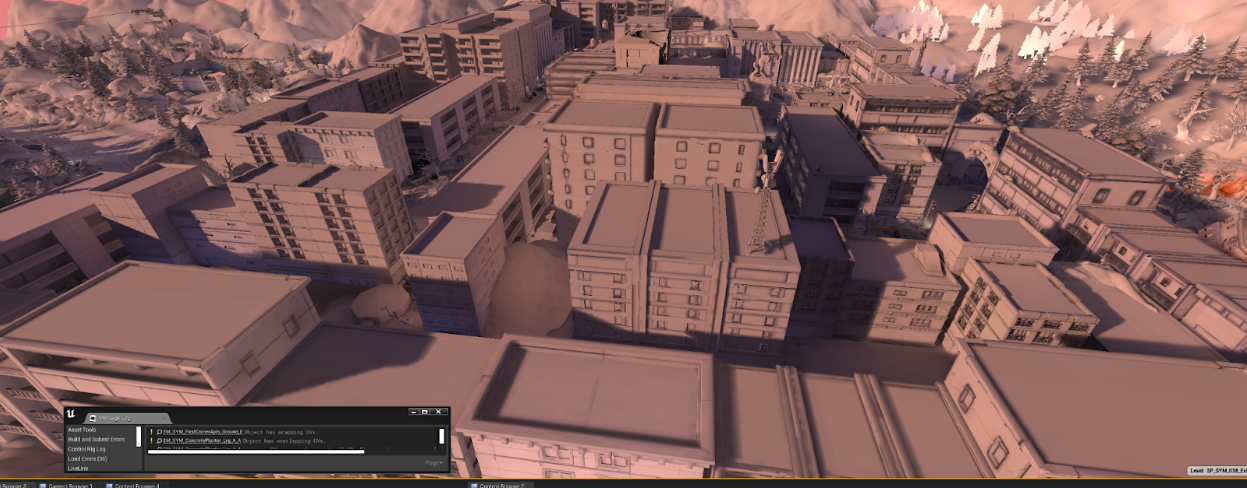
The cornerstone of optimization: LODs. This aspect of game development has become less and less relevant over the years as DLSS becomes standard and as engines and graphics cards are able to handle more information, but there are some places where optimization is still absolutely necessary for good performance. Hardware limitations for platforms like Nintendo Switch, VR, and mobile pretty severely limit what you can get away with on screen, and necessitate strict polycounts and draw calls. Twisted Pixel did an absolutely incredible job optimizing their assets and the functionality of features to provide the player with a smooth and engaging gameplay experience, despite the expansive world they’ve built and the complexity of their levels.
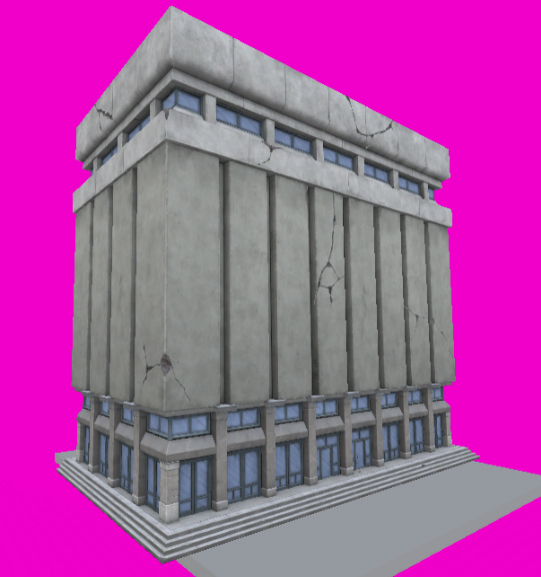
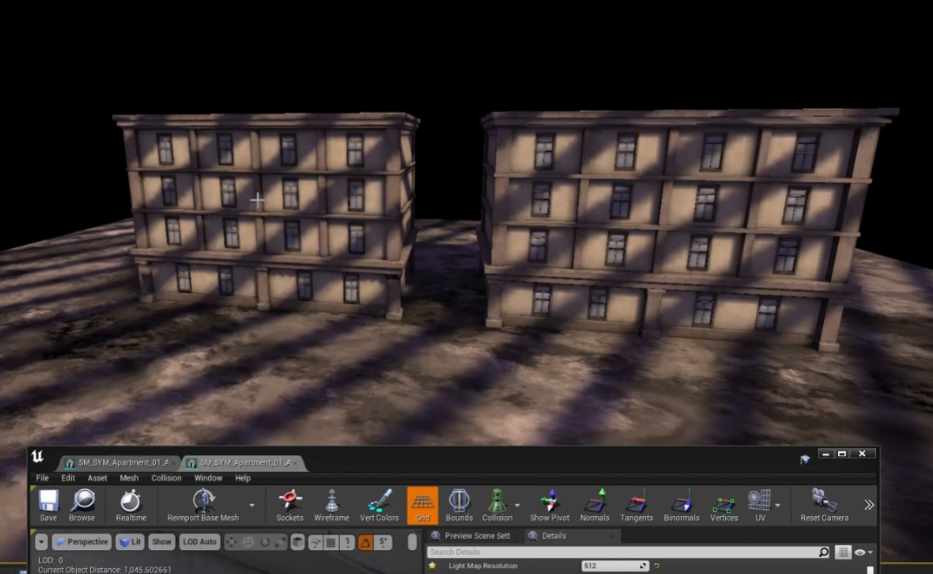
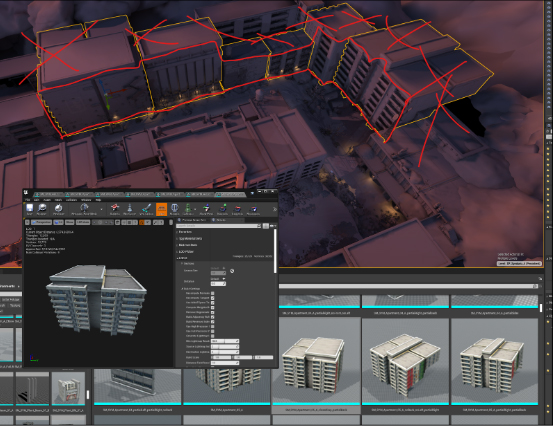
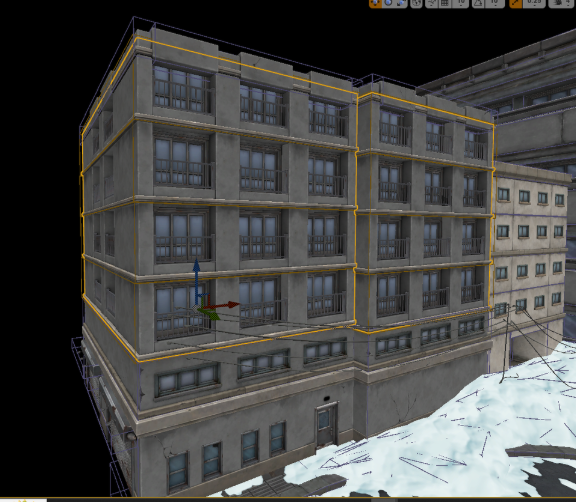
This project had multiple levels with procedurally constructed buildings, in various configurations and styles. In order to really save time on modeling bespoke buildings for each and every city block, these “chunks” consisted of a ground floor, a couple of variations of the 2nd and 3rd floors, and a roof “cap” so that they could be assembled and organized in editor by TPG’s level designers. A few larger landmark buildings were added to break up the silhouettes of the skyline, and typically were modeled as standalone, complete objects. We did find, however, that even with Unreal’s auto-LOD system, there were too many draw calls and the scenes, (particularly in Symkaria where most of the story takes place on city streets) were tanking performance. We also encountered an issue where Unreal’s auto LOD system created large gaps and holes in the mesh where window panes and doors met walls.
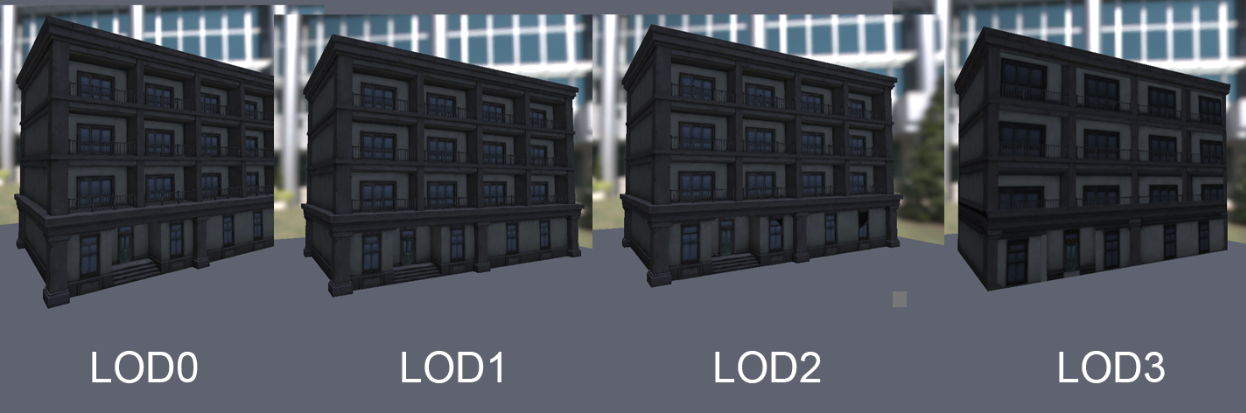
To address these issues, we immediately focused on welding all vertices of the buildings, including both completed structures and building chunks. By bridging gaps and filling holes behind windows—even if it necessitated extra extrusions—we ensured an LOD1 and LOD2 result that would not have holes or visible gaps when they were viewed at a distance. We utilize our expertise and available tools to establish your LOD distances during the implementation of custom meshes or LOD generation. This initial setup saves you time, allowing you to focus on fine-tuning those transitions later.
Due to the sheer scale of the level, we needed an LOD with much less geometry, as even the LOD3 mesh getting generated had hundreds of triangles per building, which was not going to work for our purposes. We went ahead and made an LOD3 model, an extremely simple shape like a cube, or a cube with just a few indentations for the sake of silhouette, and used 3DSMax’s render to texture feature to get all of our texture information baked down. This was important, because these buildings utilized three different UV Channels for their textures and we needed our baked diffuse maps to include all of those composited details.
UV Channel 1: Diffuse textures with flat color, tile and surface quality — concrete, metal and window trim sheets
UV Channel 2: Transparent dirt and grunge maps with superficial cracks which can be shifted and moved across buildings to create unique facades
UV Channel 3: Lightmap UVs only
LOD0 vs LOD3
These methods worked exceptionally well and really helped with performance, but there was just one problem: with completely different UVs, any baked lighting these buildings would receive would break on LOD3, unless we gave LOD3 three unique UV Channels as well. Which brings us to how we handled lightmaps for these optimization passes.
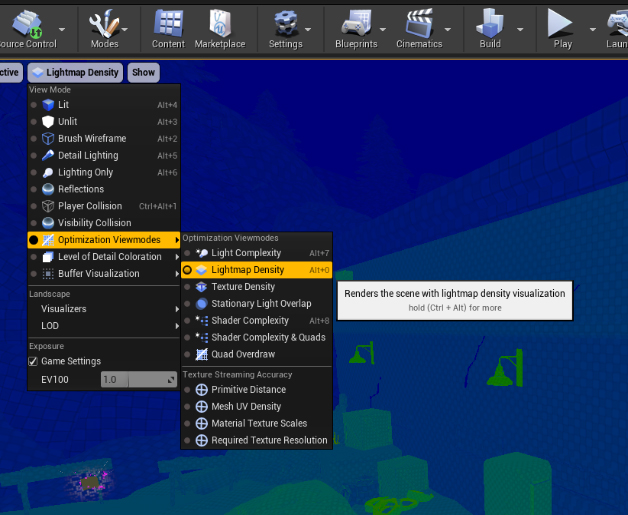
Lighting and Lightmap UVs
For this particular project, lightmaps and lighting was a massive undertaking that took us months of work, but once we got through the initial pain points and developed a system, it massively improved performance. Now, as described above, each building “chunk” received custom made and edited LODs; the problem being that they did not share UVs or UV positions all the way down the line. Because LOD3 was essentially just a cube that received its own textures, we needed a way for our baked lighting to work across all LODs seamlessly.
After a lot of trial and error and collaboration with TPG’s lighting artist, we figured out a way to have our baked lighting work across the LODs, by ensuring that the Lightmap UVs, even if they didn’t match positionally, all had the same UV Channel assignment: in this case, UV_Channel_2, which would actually be the third UV channel, UV_Channel_0 being the first. Across all the buildings for these city environments, each and every piece, prefabricated building, and LOD following had 3 UV Channels with their Lightmap settings set to target that third channel and source the first, and due to that we got a beautiful, performant result. This worked because Unreal can and would automatically generate Lightmap UVs for LODs and existing assets anyway, but if we imported an LOD mesh with the three UV Channels designated and assigned we could still force baked lighting to use that last UV Channel.
This method works whether the Lightmap UVs for LOD0 are created in Maya or in Unreal. If generated in Unreal, the steps were as follows:
- Unreal would crash when attempting to re-import the custom-made LOD3 from Maya — with 3 UV Channels but no bespoke Lightmap UVs across any LODs — so it (the LOD) must be removed altogether and then manually added back.
- Even though we created a Lightmap UV in Maya using UV_Channel_2, Unreal will still force generate one itself from Index 0. If Generate Lightmap UVs remains unchecked on LOD3, they disappear entirely. This was a strange finding that we could not get answers or documentation on, but we ended up making it work for our purposes.
The steps were a little different if the mesh(es) already had custom lightmap UVs made in Maya, optimized explicitly by an artist, that must be maintained — at least on LOD0. We did the following:
- Remove LOD 3
- Import LOD 3 FBX
- Check Generate Lightmap UVs and set Destination to UV Channel 2
- Apply Changes
- Set Distance of LOD3 to 10000 (or best judgement.)
- Change Light Map Coordinate Index to 2.
We optimized existing lightmap UVs as the ones generated by Unreal really didn’t offer much value and did not make the best of use of space or texel density. So along with creating LODs, we sewed all UV shells together that could be sewn together, and stretched / unfolded UVs to get the best possible results out of our lighting. There was a lot of back and forth between editor and source files and many, many iterations of building assets. However, it immensely improved the game’s visual quality. This support was essential because the internal team could not have reasonably accommodated these tasks without our assistance, and we were pleased to provide it.
Material and Physical Material Assignments
While material and physical assignments are a bit self-explanatory, they are nonetheless something we have seen get missed throughout the project. Textures may be correct, but there could be an incorrect shader assignment on the material itself. When it comes to physical materials, that is materials which offer some sort of unique audio or visual effects feature upon being interacted with, may be assigned incorrectly or not at all. A certain type of foot step sound on hollow wood might be relegated only to a specific level, where other hollow wood objects receive a different physical material in other levels. Not everything will have a physical material of course, but if it makes sense to add them it can definitely add some life and a bit of character to your game.
Further Platform Optimizations
You might realize down the road while playing and game testing, particularly for hardware-limited platforms like Mobile, VR, and Switch, that a scene or a level is just too heavy. Too many draw calls, too many assets not being occluded, too many polygons.
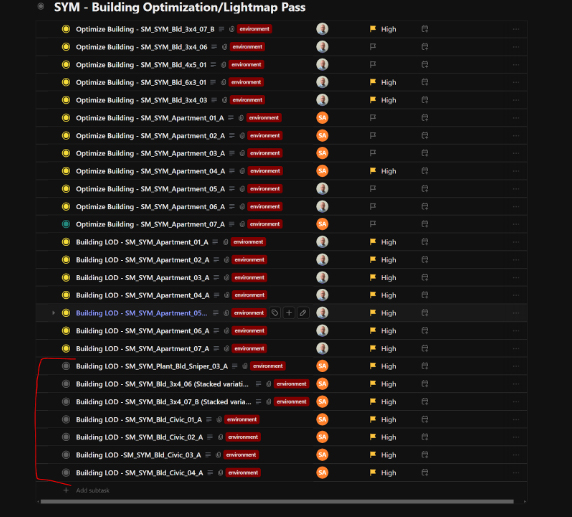
To further boost performance, we undertook the arduous but worthwhile task of creating a set of combined apartment buildings. For these assets, which featured the welded windows mentioned previously, we deleted any faces that would be permanently obscured or not visible. This process yielded a series of assets labeled as follows:
SM_SYM_Bld_3x4_07_B_4stack_noBack_partialLeft
SM_SYM_Bld_3x4_07_B_4stack_noLeft
SM_SYM_Bld_3x4_07_B_4stack_noRight_partialBack
SM_SYM_Bld_3x4_06_BD_3stack_partialWalls
Under certain circumstances we also combined piles or grouped instances of objects into one merged asset to improve performance, using Unreal’s native Merge Actors tool with the Merge Materials option. Thus ensuring all instances are part of a single Instanced Static Mesh (ISM) or Hierarchical Instanced Static Mesh (HISM) component that results in just one draw call. Which can be achieved manually as well when using other engines, by exporting posed static meshes, like with Unity’s export GameObject as FBX in scene context plugin, and combining them in the 3D Modeling package of choice, and reimporting them.
Contingencies and Constraints
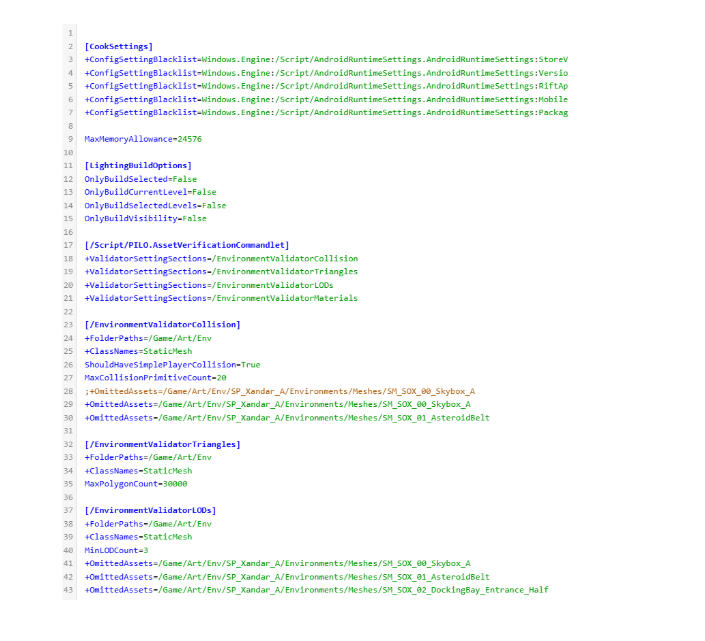
Large scale programming and engineering isn’t something our team usually handles, however, we are capable of editing line items as needed in custom scripting. In this particular pipeline, Twisted Pixel had a custom asset verification tool that filtered every single asset brought into Unreal Engine with the following parameters:
- a minimum of 1 collider
- a maximum of 20 colliders
- no more than 30,000 triangles
- a minimum of 3 LODs
- no more than 5 material IDs
- no more than 3 UV Channels
Exceptions to the rules are inevitable. For instance, a very large environment asset heavily using trim sheets might justifiably require more than five material assignments. Similarly, an out-of-bounds set dressing piece, like a tower spire, that characters will never interact with doesn’t need collision objects. To prevent level designers, developers, and other key team members from being needlessly alerted to non-issues, we implemented line-by-line exclusions into the script. This streamlined the QA process, making it very easy to quickly identify and fix problematic assets or mistakes such as unnecessary, empty material slots or unused UV channels.
Wrapping Up and Submitting
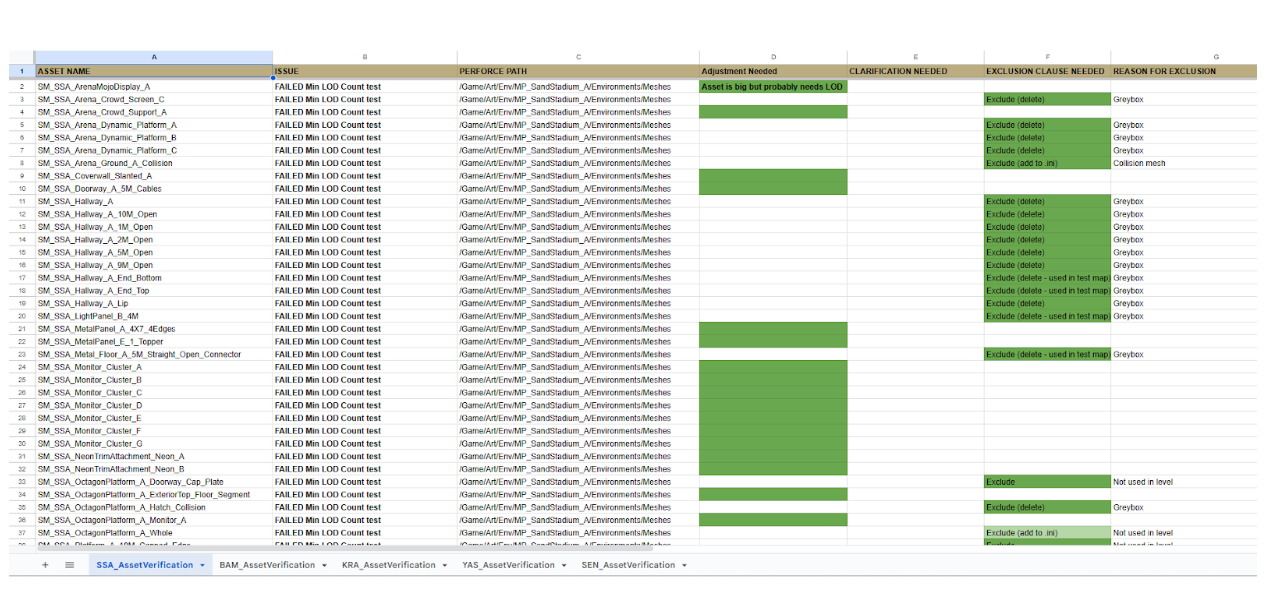
Being so comfortable in the engine and understanding how to integrate the team’s work, we do our submissions in editor of choice and push those changes through source control so the internal team doesn’t have to spend precious hours importing the assets and adjusting all of their settings. Below is an asset tracking sheet we created for the art director over at TPG so he could see and track our progress as well as keep note of exactly what adjustments were being made either to individual assets, or the DefaultEditor.ini file we wrote exclusions and line items into. Green text boxes being completed and approved assets, yellow being actively worked on or needing clarification, and red being an issue at present that has not yet been resolved.
This proved to be invaluable to the process, providing assistance with tasks that are often avoided or are not well understood by 3D artists, that tech artists lack time for, and that art directors, while capable, may overlook when handling extensive workloads alone.
From our experience, we can highly recommend integrating a dedicated, experienced Pipeline and Asset QA artist onto the production team. This role proved absolutely essential for making the level creation process a far more seamless endeavor, and we believe the investment is worth the time and budget. We had an absolute blast diving into the world of Deadpool VR, and it was an honor to be a part of the team bringing it to life!